
Lord of the Blade
|
“I’m tired of all this nonsense about beauty being only skin-deep. That’s deep enough. What do you want — an adorable pancreas?”- Jean Kerr
There’s something quite profound about scarification that marks it apart from other forms of aesthetic body modification. Whereas tattoos and piercings augment and decorate the body by adding ink or metal, a scar is created merely by interacting with what’s already there, harnessing one of the peculiarities of the skin and channelling it to decorative ends. By using a scalpel, branding iron or cautery pen, it is possible to create intricate patterns in the skin, which, when healed, form distinctive and permanent scars. I really see this as body modification in its purest form — the body itself is producing the artwork, sealing over the inflicted wound and leaving an enduring mark that is actually part of the skin, not an inorganic addition.
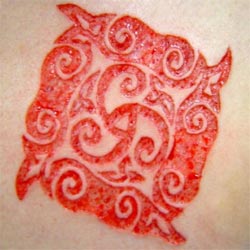
Unfortunately, the idiosyncratic nature of an individual’s healing often makes the results of scarification fairly unpredictable, and as such the designs attempted have usually been fairly simplistic. In the West, scarification has tended to be either pieces made up of single line scalpel incisions for fine work or large, heavier scars produced by branding. Over the last few years, however, a number of scarification artists across the globe, feeling artistically constrained by the limited results and narrow range of designs that can be produced by single-line cuttings and the unpredictable and brutal scars left by brands, have begun to experiment with skin removal techniques, using their tools to actually remove areas of the upper layers for skin to produce larger, bolder and more predictable results.
 |
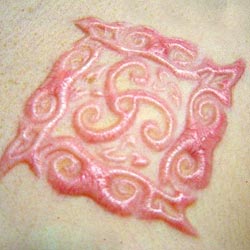 |
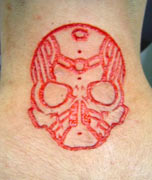
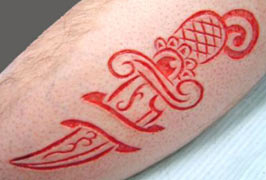
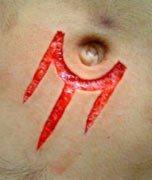
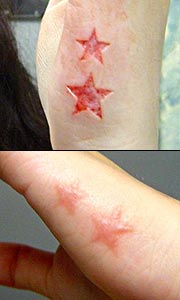
| Fresh and healed skin removal by Ryan Ouellette | |
Skin-removal really is in its infancy, and this article is in no way intended to be a how-to or instruction manual on the intricacies of this invasive and potentially dangerous procedure. Please do not try this at home. Instead, I hope it will illustrate what it is possible to do with the human body’s largest organ and germinate a few ideas in your head. I’ve been fortunate enough to be able to interview one of this community’s most prominent, prolific and talented scarifiers, and this article is in many ways both a portrait of him and an introduction to his often astonishing work.
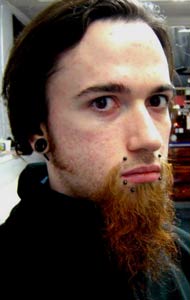
Although not the ‘inventor’ of this technique by any means, Ryan Oullette (IAM:The Fog), a twenty-five year old artist working out of Precision Body Arts in Nashua, New Hampshire, is widely regarded by his peers as one of the best scarification artists currently practising skin removal. Photos of his scars were recently showcased in National Geographic magazine, the patterns and motifs he produces are brave and original, and his work — both fresh and healed — is simply stunning. Chatting with other scarification artists, Ryan’s name comes up again and again when they’re asked whose work they particularly admire.
 |
 |
| Where are you from originally, Ryan? |
One of the bigger things that sticks out in my head is reading an interview about Blair and his branding. He talked about how a lot of branders were scared to hit the same line multiple times and he said something along the lines of “work it until you’re satisfied”. And that really influenced my cutting style. Instead of trying to get a perfect line in one pass I hit and re-hit the same multiple times until I got it looking exactly how I wanted it. My cuttings are actually influenced most by Blair’s brandings if that makes any sense.
 |
 |
 |
| Can you talk me through the procedure, from start to finish? | ||||
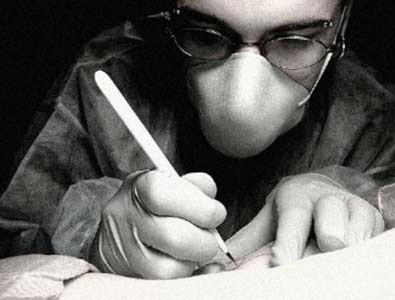
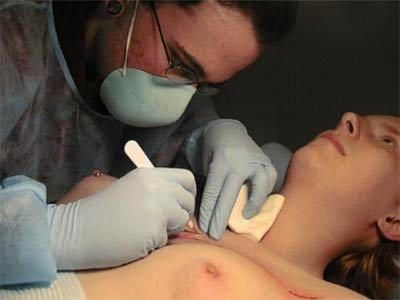
Well it’s actually pretty similar to a tattoo for set up. The skin is shaved when needed, cleaned (sometimes with iodine, sometimes with Technicare), and then I put on a stencil. After all the prep stuff I usually make a quick pass over the entire design with a #11 blade scalpel. I basically consider it guide-lining. It’s not very deep, and it looks pretty uneven at first. It’s basically just opening up the skin over the whole piece very shallowly; the depth isn’t evened out until the next step.
Next I’ll usually change blades to keep it sharp, and then I’ll go back over the design and slowly even out the depth and width. The depth and width varies depending on the design. If it’s single line I tend to go a bit deeper and wider. If I was doing removal I would go a bit shallower because I’ve learned that if you do flesh removal too deep it tends to blob out and heal unevenly. For removal sections I get my outlining done and then I use some haemostats to basically just pull up a corner. Then I use a #15 blade and slowly separate the tissue up and away while I lift with the clamps. I try to go as even as possible because you obviously want a uniform removed section for good healing. I try to make my removed sections as small as possible because I’ve noticed that if you try to remove too large of an area the center of it tends to be excessively deep. I’ll often split a removed area into smaller sections or strips and remove them individually instead of just on one large hunk. As far as the depth goes I’ve talked to a lot of very good scarification artists and their techniques all vary. Depth is really just whatever works for the individual. Generally you’re going into the tissue below the cutaneous layer but not through the fascia. And I’d say that good flesh removal is typically slightly shallower than single line scarification. You really want to keep it uniform. You don’t want to see pits and valleys because that means different tissue layers, hence different scar production.
In terms of blood control, basically I just pat my field with paper towels as I work, again similar to tattooing. I really like to keep my lines clean and as dry as possible. Some people bleed more than others, obviously, so sometimes it’s hard to keep things as clean as I like but I generally don’t like blood to leave my immediate field. I don’t just let it drip all over the place like some people tend to do. It’s partially for contamination control but it’s mostly just so I can clearly see the cut depth and width clearly. The bleeding tends to stop within five minutes of finishing a line. So by the time I move on to a new line my previous ones are usually dry. I’ll occasionally clean the field during the procedure, typically between steps. So maybe once after all the outlining is done, and then again when the piece is completed. I typically clean the field with green soap solution, again like a tattoo. After I’m done I’ll bandage the area with a sterile non-stick dressing. I usually tell the person to keep it bandaged for at least four to six hours. Sometimes, particularly for flesh removal, I’ll just have them keep it bandaged overnight. As for removed skin it’s basically nothing by the time I’m cleaning everything up post-cutting. Without blood supply it shrivels up within just a few minutes. |
||||
| What are the benefits of skin removal — what can be done, and what are the limitations — what can’t be done? | ||||
|
I think the main benefit with flesh removal is additional control. With a single line cut you make a cut and basically just widen it out and change the depth. So if you make a slight error all the cuts from that point on are going to have to work around that one mistake or even it out. With flesh removal you can control both the outline and center of all lines and sections. If I want to do a grouping of small tight lines, especially with angles or curves I’ll almost always do it with removal. If you do single line you are basically splitting the skin open so that can sometimes limit what you can do right next to a line. With flesh removal you are going shallower so the skin tends to open less. So I can do tightly compacted lines and feel confident that they’ll heal where I put them. If I tried to do lots of small lines within an eighth of an inch they would tend to scar outward and probably blend together during the healing process. The lines are more straight down and tend to heal in their original location unless they keloid a significant amount.
As far as what can’t be done I guess I would push people away from very large sections of removal. If someone wanted a removed section bigger than maybe two inches wide I would probably try to change their design or flat out turn them down. As far as complexity I’ve never had to turn something down because it’s too complex. I’ve had to rework designs to simplify them slightly in order to be able to cut it into someone. Obviously you can’t do shading, so I have to redraw things to make them bolder, kind of like a solid black tattoo. There are some areas I would prefer to not work on like hands, wrists, necks, and so on. But I’m sure if someone really wanted a piece there I could figure out a way to do it safely. I’d just have to do it a little shallower than average. I did some flesh removal stars on the side of my girlfriend’s hand and it was very difficult. Two little coin-sized sections took me about two hours because I had to be so careful with my depth and remove the tissue at the exact same shallow level. |
 |
 |
| What are the risks? | |
| Risks are similar to any comparable procedure like tattooing or branding. The biggest risk would be infection but I’ve never had a problem with that. I give very clear aftercare instructions so it hasn’t been an issue. That’s the only thing I would call a risk. There are more complications that could come up like uneven healing and scarring mostly. Occasionally a person can get kind of a rash around the piece, depending on aftercare. It’s usually from wrapping it the wrong way or not cleaning it often enough. | |
| What aftercare do you generally recommend? | |
|
My basic aftercare is that they keep it covered with plastic wrap and Vaseline for about seven to ten days. It keeps the body from forming a scab which makes it heal more from the bottom up instead of from the sides inward. It’s just important with wrapping that you keep the piece clean and somewhat dry. So I tell the person to unwrap and clean it throughout the day. I usually just have them use an antimicrobial soap like Satin or Provon. If they don’t clean it often enough the fluid under the wrap can cause irritation or a rash. The rashes are more frequent if I have to shave the person before the cutting.
I basically just worked out my aftercare with trial and error. I also talk to a lot of other artists about technique so I steal a lot of ideas from them. Sometimes I’ll suggest using a mild irritant like lemon juice mixed with the Vaseline. It can tend to make the body heal with either a darker hypertrophic scar or, with a little luck, raised keloid tissue. |
|
| How long is the healing period, generally, and what are the stages of healing? | |
| Complete healing varies on how they take care of it. With the wrap I’d say that the body will form a new layer of skin over the whole design within around two weeks. If they keep it unwrapped the body will scab slowing the healing process to maybe three weeks. If you add in agitation, picking, or scrubbing it could lengthen it out to a month or more. |
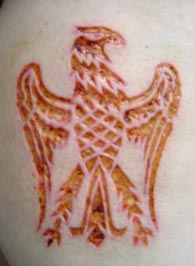 2 days old |
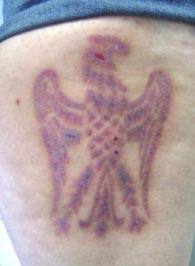 5 weeks old |
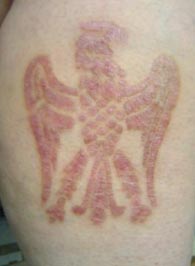 3.5 months old |
| What kind of results does skin removal produce — what do the resulting scars look like compared to other forms of scarification? | |
|
With my removal it’s not really making the body heal in a specific way. It’s really just emphasizing the way an individual’s body will heal a cut. I’d say on a whole removals tend to give a better more distinct scar. But it’s very difficult to force the body to heal one way or another. Keloid tissue is more of a raised pinkish tissue. It’s basically what most people hope for with healing but it’s actually not that forthcoming in a lot of pieces. I’ve notice that the body heals more commonly with hypertrophic tissue. This tends to be more of a darker granulated, less raised tissue. What I shoot for with aftercare is either a very dark distinct hypertrophic scar or an evenly raised keloid scar. I never guarantee a certain look though, that would just be impossible.
As for how it looks compared to other scars I’d say flesh removals don’t scar outward as much as some other techniques. Brandings tend to heal outward a lot more due to the heat damaging surrounding tissue. A lot of single line scarification tends to be deeper than removal so the line can heal a little wider due to it having a tendency to heal in more of a V-shape then wide U like some removals. |
|
| Is there anything else you’d like to add? | |
|
Yes! It’s really important that people remember that these procedures can be extremely dangerous if not done by a skilled professional with a decent amount of anatomical knowledge and experience working with skin. If not, people could end up in hospital! The difference between single line and removal can be compared to the difference between punch-and-taper piercing and transdermal implants. They might be similar but the latter is a lot more advanced and dangerous. |
If you’re interested in getting work done by Ryan, his shop Precision Body Arts is located at 109 West Pearl Street, Nashua, New Hampshire (or call 603-889-5788). You can also see more of his work in his gallery on BME (and of course you can view other artists working in similar styles in the general scarification galleries as well).
As scarification techniques evolve, designs which previously would not have produced good, clear, dramatic looking scars become possible. The only limits are those of your imagination and of your artist’s skill. Choose wisely.
– Matt Lodder (iam:volatile)
Matt Lodder is a 24 year old native of London England. He wrote his Masters dissertation for the University of Reading on “The Post-Modified Body: Invasive corporeal transformation and its effects on subjective identity”.
Thanks so much to Ryan for agreeing to be interviewed, and for being so eloquent and forthcoming with information. Thanks also to Quentin (iam:kalima) and Vampy (iam:vampy) for their help in answering my questions, and also to Shell (iam:stunt_girl) for her last-minute assistance!
Online presentation copyright © 2005 BMEzine.com LLC. Requests to republish must be confirmed in writing. For bibliographical purposes this article was first published online January 7th, 2005 by BMEzine.com LLC from La Paz, Mexico.
 BME/News and Modblog highlight only a small fraction of what BME has to offer. Take our free tour and subscribe to BME for access to over 3 million body modification related photos, videos, and stories.