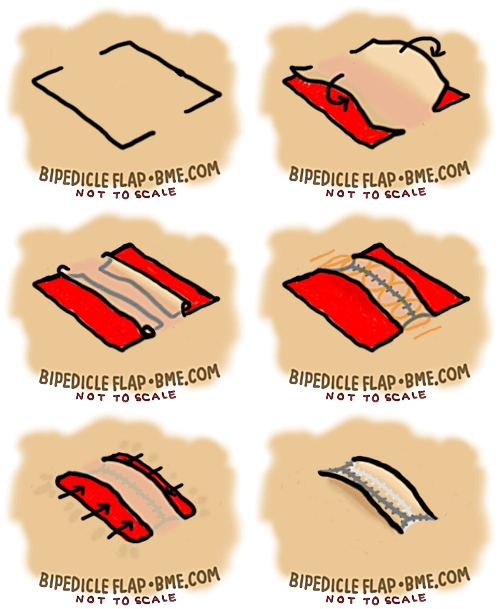
 One of the Holy Grails of body modification is a difficult procedure called the bipedicle flap, first popularized by Erl Van Aken — a fascinatingly eccentric bodmod pioneer, who in addition to “inventing” the bridge piercing (if you’ve ever heard someone call it an “Erl”, he’s why), helped build the Lunar Rover for NASA that was used in the Apollo moon missions — who wore a large one on his belly. It’s essentially a hefty “handle” made out of flesh (“bi-pedicle” as in “two feet”), and requires the skills of a reconstructive surgeon to do it. Flap procedures are regularly used by reconstructive surgeons for a wide variety of procedure in a wide variety of styles for different purposes — if you do some googling you’ll find some fun things, like a guy who had to have his cock temporarily attached to the bottom of his scrotum after a cock ring betrayed him — but bipedicle flaps are the only one used in body modification procedures in our subculture. I don’t know if we’re moving too far into medical territory if we move beyond that, but in terms of treating the human body like lego and rearranging its parts, this class of surgery opens a lot of very interesting doors!
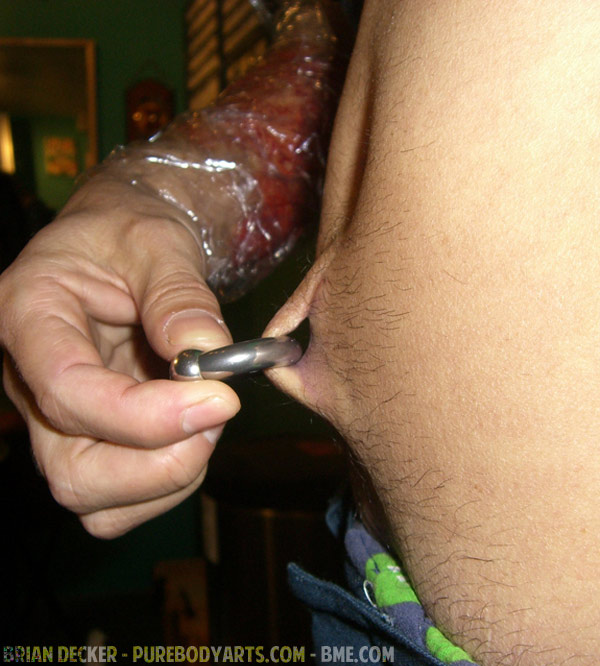
Procedurally I’ve tried to explain how it’s done — very roughly — in the little animation at the top of the entry. I hope you can appreciate how incredibly tricky this is to do! There are very few practitioners capable of doing this procedure, and even among them, the success rate is not perfect. This is one of the best I’ve seen to date, and it should come as little surprise that it was pulled off by Brian Decker (purebodyarts.com) — the only other people I can think of as I write this to have tackled the procedure properly are Jon Cobb and Howie/LunaCobra (although I’m sure there are others). This one though I can show you solid healed pictures of, and in addition, Brian has been kind enough to include comprehensive pictures throughout the healing process — it sure looked touch-and-go for a while, didn’t it? Click on any of the pictures to zoom in.
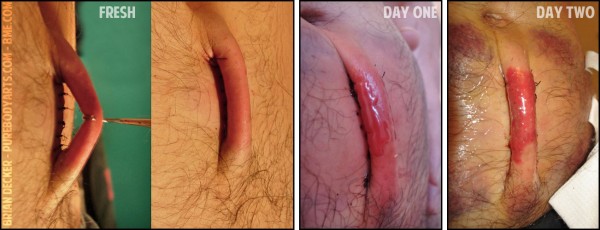
Fresh the procedure looks happy and clean. If all you saw was the fresh picture and the healed picture, you would have a very different idea of the healing process than actually happened. On day one the whole area is inflamed with a fresh bruise and what looks like a blister of lymph and intracellular fluids collecting on the flap. By day two the redness is more specific along the tube of the flap — which must have made them think the procedure was about to fail — and you can see an interesting “halo” of bruises around the procedure. The reason that the bruises are in a halo pattern is because on the central section there is more pressure from how the skin has been pulled tight to fill the open hole (see the animation), and this pressure is enough to “squeeze” any stagnant blood out of the tissue stopping it from bruising there.
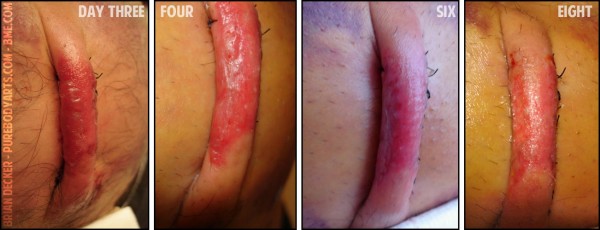
Day three and four are also quite worrying, and although the blistered tissue has receded significantly, and the flap is still very red. However, the sutures and footing looks healthy which is a good sign. By week’s end, the blister is fully dry and the redness has reduced dramatically. Everything is holding together nicely with no separation, but the tube is still fairly swollen.
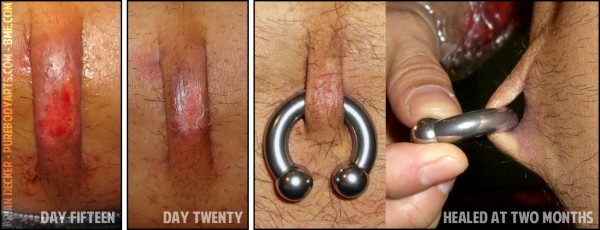
By the end of the second week, the tube is significantly less swollen and while still centrally red and irritated, is looking better every day. By the end of the second week, the tube is no longer swollen at all, and only minor skin irritation remains. At two months, the procedure is completely healed and is able to support heavy weight.
I’d say this is a good result on a remarkable and challenging procedure that offers anatomical alteration options beyond what can be done with piercing. Congratulations to both Brian Decker and the client for pulling this off.
