SkinTunnels Galore

I’m happy to see that Gabriele‘s SKINTUNNEL design is entering the palette of body modification options beyond Italy. For example, Brian Decker of Pure (purebodyarts.com) just did a set of them on Ashan’s arm, using a single incision to insert both of them (push the incisions for the posts to push through — see our earlier posts on SKINTUNNELs to see the jewelry if you’re unfamiliar with it).

Iestyn Flye (the-absolute.co.uk) has also been doing them, the one on the back a collaboration with Gabriele that’s a month old, as well as another one on Yann Brënyàk. You gotta love the hex-head transdermal next to it by the way!

I’ll also mention that the first ones that Gabriele did are still looking good and beginning to stand the test of time. Here’s the neck at four months old, with a fancy new cap on it as well, which you can also see on the original wrist SKINTUNNEL which I think is about six months old now.

PS. Until Gabriele and Rachel have a chat about adding SkinTunnels to BMEshop (which I think would be a great way to introduce them to even more people), if you are a body modification practitioner interested in these, contact Gabriele directly if you’d like to talk about ordering a set.

Tattoos with Boob Jobs

Some of you may remember five years ago when Lane had Brian Decker give his tattoo a boob job, which unfortunately came to an unpleasant demise. Amusingly this is a not uncommon gag, and I know a few other people with it as well. For example, I suspect after seeing Lane’s (although I don’t know that), my friend YK did his own breast implants on his tattoo, hand carving a piece of silicone and putting it in himself. Another friend shaped his tattoo into a more subtle form by injecting wax underneath it, and I suspect that as custom implants become more available, the art of mixing tattoos with implants will mature by leaps and bounds.

PS. Because I’m currently working on interviews, you may notice me posting some pictures that have already been featured some time ago in the main BME archives, as I run across things that also make an interesting ModBlog post.

Pointing versus Shaping

I wanted to highlight and contrast two very different procedure styles of getting “elf ears” from two talented artists. In the ear on the left, done by Brian Decker (purebodyarts.com) you’ll see a traditional ear pointing procedure pushed to it’s max, giving quite a radical point — very long and pronounced. The end result is quite alien and very striking — if you want to see a well-healed result, look at Tye’s ears which are featured in the last Modified World video I posted. The other ear was done by Samppa Von Cyborg (voncyb.org) — you saw the customer’s other ear last week — and involves a complete top to bottom reshape of the ear. The lobe is removed, the contour is reshaped, and a more subtle point is formed. This also results in a slightly smaller ear because of the tissue removed — I’ve tried to put the two ears roughly to scale.

I don’t have particularly strong feelings as to which one of these ear styles I prefer — I like each for different reasons. The one produces a far more extreme appearance, and the other is more “natural” looking for lack of a better term… I think there’s space for each of them and I don’t one procedure replacing the other — it simply broadens the palette available. After the break you can see a larger photo of the ear by Samppa as well as both of the ears of Brian’s customer.

Cale’s New Facial Scars

Cale Belford (piercer at True Blue Tattoo) just met up with Brian Decker (purebodyarts.com) and had this beautiful scarification done on her cheeks. The first photo shows it completely fresh, and the second was taken right after Cale cleaned it in the shower for the first time.

If you look carefully at the first photo you’ll notice that it’s half cut and half electrocautery branded. I wondered why that was so before posting I asked Brian whether this was just for fun, or if it had something to do with the way the different techniques behave on skin — for example, strike branding can cause the surrounding skin to contract and distort significantly. He replied,

Some of the reason was variety and fun, for sure. The “branding” was done with an electrosurgical cutting unit, which actually does little to no cellular damage outside what it touches, so the results are very much like scalpel cutting. The main reason I implemented the device is the ease of it. Scalpel cutting lines on faces is generally an annoying mess. The skin doesn’t open well and bleeds like hell. With the ESU I can pretty much shovel the skin off at whatever depth and width I want with no bleeding.

As if you need another reason to choose Brian Decker for your scarification work, but I hope this illustrates the value in going to a scarification artist with mountains of experience. Just because it doesn’t require a lot of skill to give yourself a glorious papercut, it doesn’t follow that it’s also childsplay to create a beautiful and balanced piece of scar art. I will of course post in the future on the healing of this piece.

Successful Bipedicle Flap Procedure

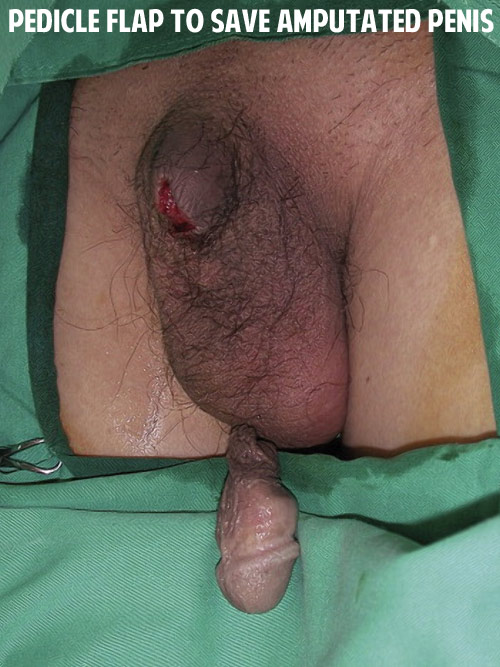
One of the Holy Grails of body modification is a difficult procedure called the bipedicle flap, first popularized by Erl Van Aken — a fascinatingly eccentric bodmod pioneer, who in addition to “inventing” the bridge piercing (if you’ve ever heard someone call it an “Erl”, he’s why), helped build the Lunar Rover for NASA that was used in the Apollo moon missions — who wore a large one on his belly. It’s essentially a hefty “handle” made out of flesh (“bi-pedicle” as in “two feet”), and requires the skills of a reconstructive surgeon to do it. Flap procedures are regularly used by reconstructive surgeons for a wide variety of procedure in a wide variety of styles for different purposes — if you do some googling you’ll find some fun things, like a guy who had to have his cock temporarily attached to the bottom of his scrotum after a cock ring betrayed him — but bipedicle flaps are the only one used in body modification procedures in our subculture. I don’t know if we’re moving too far into medical territory if we move beyond that, but in terms of treating the human body like lego and rearranging its parts, this class of surgery opens a lot of very interesting doors!

Procedurally I’ve tried to explain how it’s done — very roughly — in the little animation at the top of the entry. I hope you can appreciate how incredibly tricky this is to do! There are very few practitioners capable of doing this procedure, and even among them, the success rate is not perfect. This is one of the best I’ve seen to date, and it should come as little surprise that it was pulled off by Brian Decker (purebodyarts.com) — the only other people I can think of as I write this to have tackled the procedure properly are Jon Cobb and Howie/LunaCobra (although I’m sure there are others). This one though I can show you solid healed pictures of, and in addition, Brian has been kind enough to include comprehensive pictures throughout the healing process — it sure looked touch-and-go for a while, didn’t it? Click on any of the pictures to zoom in.

Fresh the procedure looks happy and clean. If all you saw was the fresh picture and the healed picture, you would have a very different idea of the healing process than actually happened. On day one the whole area is inflamed with a fresh bruise and what looks like a blister of lymph and intracellular fluids collecting on the flap. By day two the redness is more specific along the tube of the flap — which must have made them think the procedure was about to fail — and you can see an interesting “halo” of bruises around the procedure. The reason that the bruises are in a halo pattern is because on the central section there is more pressure from how the skin has been pulled tight to fill the open hole (see the animation), and this pressure is enough to “squeeze” any stagnant blood out of the tissue stopping it from bruising there.

Day three and four are also quite worrying, and although the blistered tissue has receded significantly, and the flap is still very red. However, the sutures and footing looks healthy which is a good sign. By week’s end, the blister is fully dry and the redness has reduced dramatically. Everything is holding together nicely with no separation, but the tube is still fairly swollen.

By the end of the second week, the tube is significantly less swollen and while still centrally red and irritated, is looking better every day. By the end of the second week, the tube is no longer swollen at all, and only minor skin irritation remains. At two months, the procedure is completely healed and is able to support heavy weight.

I’d say this is a good result on a remarkable and challenging procedure that offers anatomical alteration options beyond what can be done with piercing. Congratulations to both Brian Decker and the client for pulling this off.

Scarification Progression

This is going to go down as one of my top-picks I think when people ask me about my favorite scarification work of all 2012. One of the biggest signs that this really worked out right is that it looks dramatically better healed than it did fresh — although that’s not uncommon with scars over blackwork. But for example, the central logo in the fresh photo is a sort of Obama logo or something, but healed it’s obvious that it’s a beautifully executed captive bead ring (since it’s on a piercer). The small nuances in the shapes of the diamonds seem perfectly executed, and the tiny detailed horizontal linework around the ring healed without a single apparent flaw.

This superb scarification was performed by a man you know well, Brian Decker of Pure Body Arts (purebodyarts.com), and is on Jose Tallon of Adornment Piercing in Palm Springs, California, with the original blackwork tattoo being done by James Haun (of Private Tattoo, the other half of Jose’s shop). Again, great work, and thanks to Jose for putting together this set of progression photos.

jose-vs-brian

Posted with apologies to Rob for not leaving this for him to post for his “Friday Followup”, but it’s so superb I couldn’t stop myself from starting the day with it.

The Friday Follow-up

The beauty of scarification is that the end result can never be fully predicted.  Sure you can get an idea of what a scar is going to look like if you have scars already, but even then there are so many variables that can affect healing.  Sometimes you’ll get a scar that is perfectly defined and with the colouration you were hoping for.  Other times your body just says, “hey, this is how I’m going to heal this scar, deal with it”.  The reason I’m bringing this up is based off of IAM:Polareyez‘ comment on the latest photo of her snail scar.  To give you a bit of backstory, the scar (which is actually a combination cutting/branding by Brian Decker), started out as all scars do, as an open wound.

A few months later, it was well into the healing process and was turning a pale pink colour.

And now here we are today, 10 months since the initial cutting and as you can see, it’s lightened up even more.

You may need to move your monitor around to see it, but it’s there.  What’s worth noting is that even though this isn’t the exact colouration that Polareyez was going for, the details Brian put into the scar are still well defined.  I’d even go so far to say that it’s looking a lot better than it did several months ago, if only for the consistent colour.  Fans of pale scars will certainly appreciate this scar.  As I mentioned earlier, scarification isn’t something that can be predicted with 100% accuracy, but that shouldn’t discourage you from committing to a scar if that’s the modification you’re looking to get.  You never know, you may end up with something that surpasses your expectations.

A Happy Floral Scar

You know, I’ve been seeing so much great scar work every single day that I’ve actually been censoring myself to avoid flooding my posts on other subjects away. It’s just amazing both how much talent there is — at this point you can find several competent scarmasters in nearly every major city (and then some) — but how quickly the portfolios of the top artists grow. It used to be you were lucky to get a big piece every couple months, but now it feels like there are a growing number of people who are considering scarification first, before entertaining getting a tattoo. Here’s what caught my eye today, a gorgeous floral scar done by Brian Decker (purebodyarts.com) two days ago.

flowerdecker

Bloody Sea Dragon

Brian Decker (purebodyarts.com) who did this scarification, admits that he didn’t know what a Leafy Sea Dragon was before doing the cutting, so I think I’ll use this as an excuse to tell you because it’s really a remarkable creature. It’s very much like a sea horse, which is a type of sea horse that hides with it’s extreme anatomical camouflage, drifting peacefully among plants that it looks very much like. It moves using two tiny and almost transparent fins, one on its neck and one near the tail, with the rest waving in the breeze as if they were vegetation. To survive it sucks up tiny shrimp, plankton, and larval fish through its anteater-like snout. It’s flamboyant yet serene body makes it a perfect image to capture in body art. I got to see them in person at the Monterrey Bay Aquarium when Barry of Anatometal took us, if memory serves, and they’re quite wonderful.

Above the scar by Brian, and below, the amazing lifeform it mimics.

leafy-sea-dragon-scar

leafy-sea-dragon

A Magical Implant

Oh here is an implant that I must remember to show my daughter in the morning… What can I say about this implant? It’s real, and dangerous, and a lure for fools. And Francesca was such a fool when she went to Brian Decker (purebodyarts.com) to have him install this wonderful Deathly Hallows implant on top of her hand. For those of you who are either not Harry Potter fans, or who are and can’t get enough, I’ll repeat Xenophillius Lovegood’s explanation of the symbol,

“The Elder Wand,” he said, and he drew a straight vertical line on the parchment. “The Resurrection Stone,” he said, and he added a circle on top of the line. “The Cloak of Invisibility,” he finished, enclosing both line and circle in a triangle, to make the symbol that so intrigued Hermione. “Together,” he said, “the Deathly Hallows.”

I’ll always have a special place in my heart for this book, because it’s the first major piece of literature I read to my daughter, spending a huge amount of hours reading all seven books. Anyway, the implant is looking very nice at a year old.

deathlyhallowsimplant