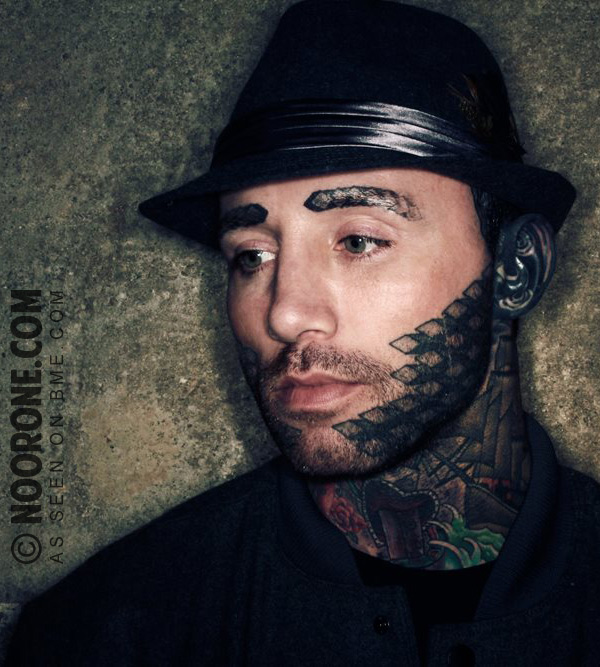
I like this portrait that Noor One (noorone.com) shot of Jilted Royalty’s Jay Read (jrworld.co.uk). It’s in part the photo and the lighting, but I love how his black ear (it really is tattooed solid black in real life) looks like a piece of slick glossy plastic, as if he’s some surreal tattooed mannequin! Click to see a large uncropped version of the photo (which might make you a nice desktop wallpaper).
Author Archives: Shannon Larratt
Post navigation
00ga Mega-Bridge Piercing
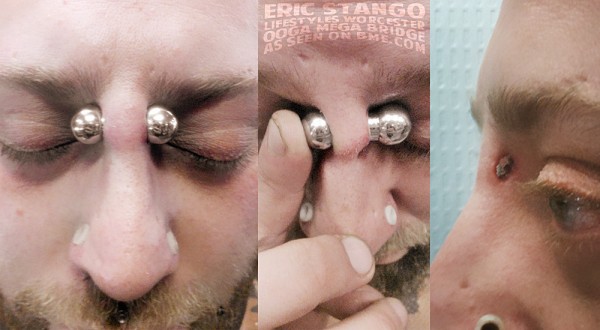
You may remember the name Eric Stango (of Lifestyles in Worcester) from a couple odd piercings from his portfolio that I’ve shared with you — the cat whiskers and the “climbing man” ear project — but today I actually wanted to show you the piercing that he wears in the middle of his face. Depending on the anatomy of their skull, many people are lucky to be able to wear a 14ga barbell, and the bridge is not generally a piercing that is forgiving to stretching. Eric though, has managed to get his up to 00ga (that’s what you’re seeing in this photo, which you can zoom in to for a closer view) — normally wearing a very hefty barbell in it — with the goal of pushing it to 1/2″.
Pointing versus Shaping
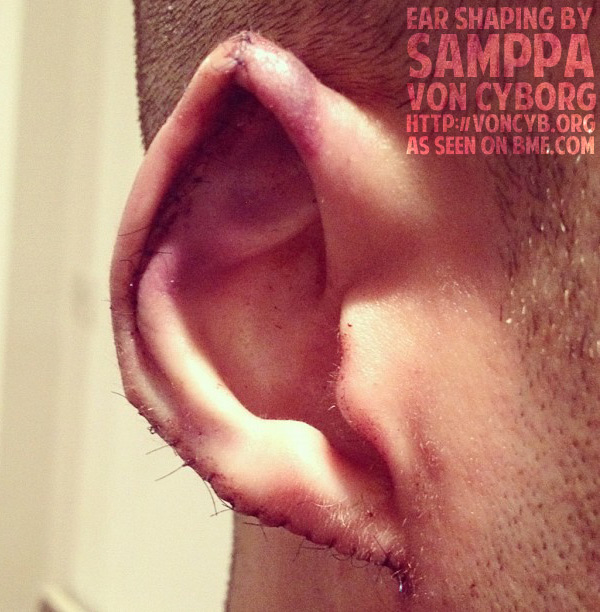
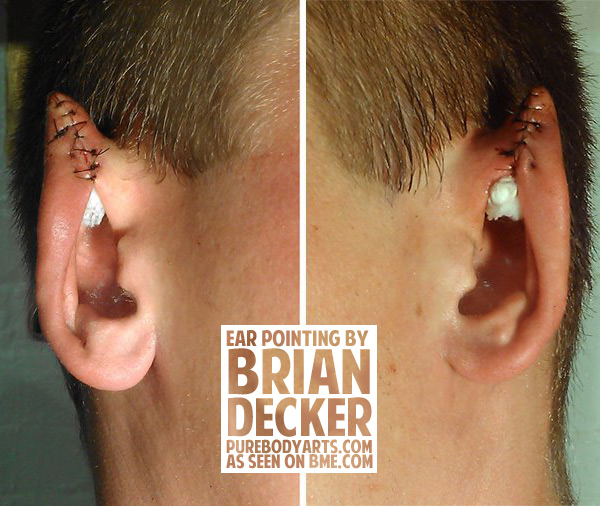
I wanted to highlight and contrast two very different procedure styles of getting “elf ears” from two talented artists. In the ear on the left, done by Brian Decker (purebodyarts.com) you’ll see a traditional ear pointing procedure pushed to it’s max, giving quite a radical point — very long and pronounced. The end result is quite alien and very striking — if you want to see a well-healed result, look at Tye’s ears which are featured in the last Modified World video I posted. The other ear was done by Samppa Von Cyborg (voncyb.org) — you saw the customer’s other ear last week — and involves a complete top to bottom reshape of the ear. The lobe is removed, the contour is reshaped, and a more subtle point is formed. This also results in a slightly smaller ear because of the tissue removed — I’ve tried to put the two ears roughly to scale.
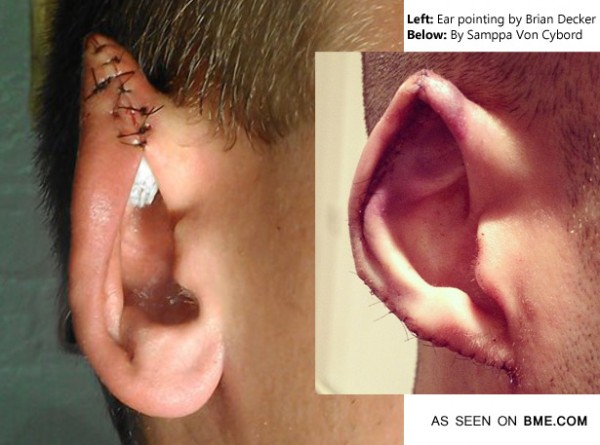
I don’t have particularly strong feelings as to which one of these ear styles I prefer — I like each for different reasons. The one produces a far more extreme appearance, and the other is more “natural” looking for lack of a better term… I think there’s space for each of them and I don’t one procedure replacing the other — it simply broadens the palette available. After the break you can see a larger photo of the ear by Samppa as well as both of the ears of Brian’s customer.
Starry Outer Conch
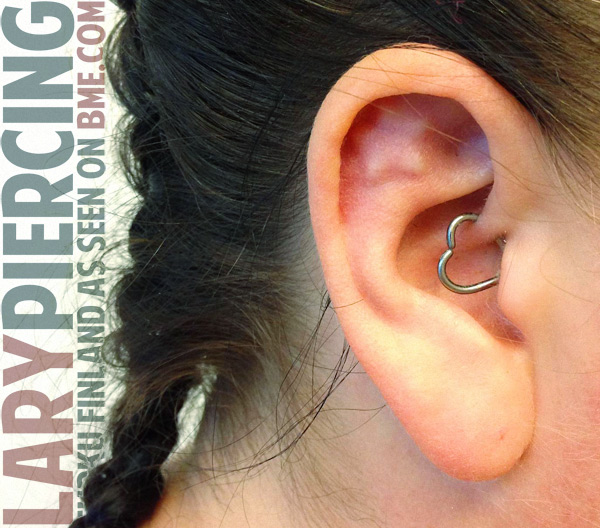
As absolutely lovely and quite discreet star-shaped implant by Lary (larypiercing.fi) in Turku, Finland. It looks gorgeous for being only six weeks old — as I mentioned in a recent posts, it can take up to a year for these very fine implants in the ear to settle and really be properly visible. The cute little heart-shaped daith is nice as well of course, but you can’t beat the subtlety of these ear implants — the sort of thing that must get a lot of double-takes from strangers on the street who notice it out of the corner of their eye, probably wondering if it’s something the person was born with, or an elective procedure, since I doubt that mainstream awareness of this type of implant is that common.
Humpback Whale White Ink Cutting
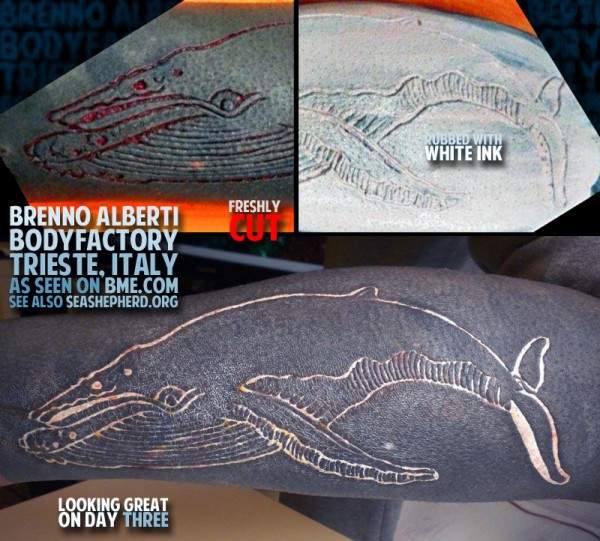
I have been watching this humpback whale scar by Brenno Alberti of BodyFactory in Trieste, Italy with great pleasure. First of all, because he’s pumped up the normal cutting over blackwork effect by a level by rubbing the cutting with white ink — I suspect this will be differentiated from normal cutting by the detail in the finer parts of the linework — but more importantly because I just love the design and it’s pristinely cut. By the way, sometimes it just amazes me how quickly scars heal — it looks so great on day three — but I suspect that with this piece the white ink is creating a bit of an illusion.
By the way, I don’t have an ink rubbing of a humpback whale, but believe-it-or-not, but I have rubbed a humpback whale. Click the pic for a closer look.
Anarchy is the only slight glimmer of hope
My father mentioned to me that I’m putting a real posting bias on scarification photos these days — I wasn’t sure whether that was a reflection on my personal interests, or on the fact that there are so many people doing great work in the field. I want to say I’ll try and be more balanced, but I’ve never been keeping my fingers still when I see something that I want to share with the world.
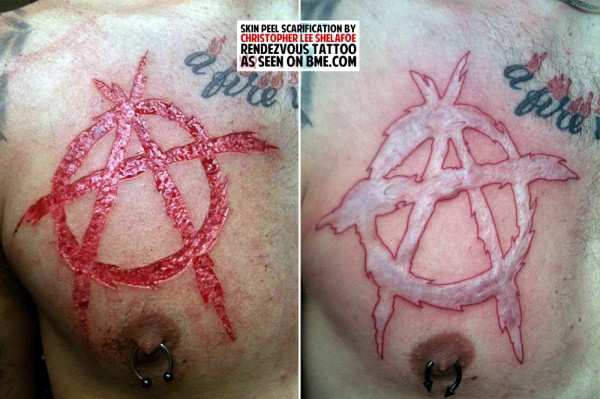
In any case, Christopher Lee Shelafoe, who permanently alters folks who walk into the doors of Rendezvous Tattoo & Body Piercing (Marquette, MI), sent me an update on Wesley Larson’s big classic-punk anarchy sign chest scar. Since doing it via standard skin peel technique, a red tattooed outline was added by Ken Jago of Dragon’s Eye Tattoo (Sault Ste. Marie, MI). Because of how light scars get when they heal (and this one is still a bit pink, with a wonderful Freddy Krueger-esque texture, and will get lighter in time), tattooing is an easy way to give them extra definition — for example, while red ink alone is perfectly cromulent, I’ve always liked (and was immediately reminded of) the scarred lettering by Azl that got two-tone tattooing added to pump up not just the edges, but the three-dimensionality.
Here’s the anarchy scar both fresh and in its current state — click to embiggen.
PS. I am also reminded of the nape anarchy scar posted last year.
Cale’s New Facial Scars
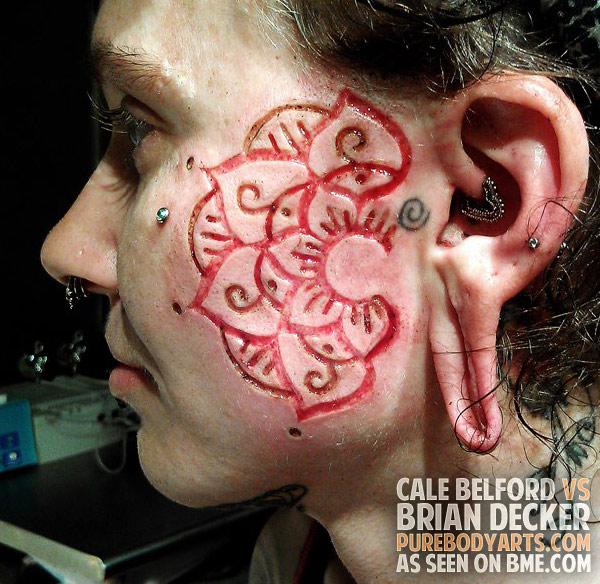
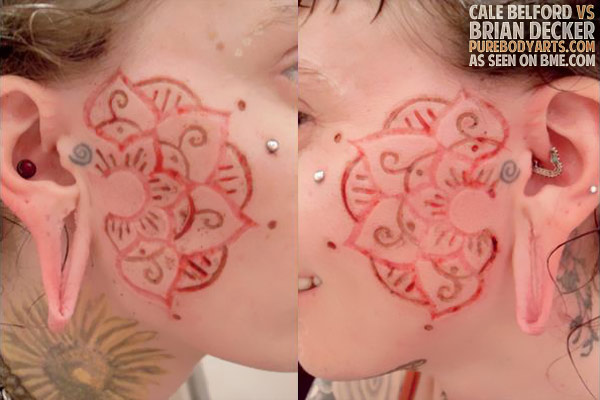
Cale Belford (piercer at True Blue Tattoo) just met up with Brian Decker (purebodyarts.com) and had this beautiful scarification done on her cheeks. The first photo shows it completely fresh, and the second was taken right after Cale cleaned it in the shower for the first time.
If you look carefully at the first photo you’ll notice that it’s half cut and half electrocautery branded. I wondered why that was so before posting I asked Brian whether this was just for fun, or if it had something to do with the way the different techniques behave on skin — for example, strike branding can cause the surrounding skin to contract and distort significantly. He replied,
Some of the reason was variety and fun, for sure. The “branding” was done with an electrosurgical cutting unit, which actually does little to no cellular damage outside what it touches, so the results are very much like scalpel cutting. The main reason I implemented the device is the ease of it. Scalpel cutting lines on faces is generally an annoying mess. The skin doesn’t open well and bleeds like hell. With the ESU I can pretty much shovel the skin off at whatever depth and width I want with no bleeding.
As if you need another reason to choose Brian Decker for your scarification work, but I hope this illustrates the value in going to a scarification artist with mountains of experience. Just because it doesn’t require a lot of skill to give yourself a glorious papercut, it doesn’t follow that it’s also childsplay to create a beautiful and balanced piece of scar art. I will of course post in the future on the healing of this piece.
Run all you want
Since I’ve been posting mostly pretty grisley procedure-heavy pictures on ModBlog today, I want to leave you for the night with something wonderful and dreamy and beautiful — this photo was taken by photographer Harri Sirola — of Souci Jaws and Lassi (scar.fi) performing. I should mention that if you want to catch up with them live, they’ll be at BMXNet in Essen in a about a week (11-14th) the Bucharest Tattoo Convention, and then off to Sweden for the Female Tattoo Artist convention in Jonköping on the 26-28th of October.

Bubbles and Blindfolds
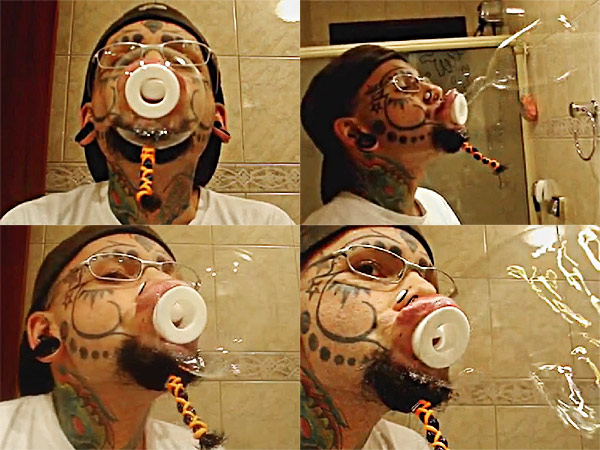
It’s the weekend — and a long weekend here in Canada — so I hope you can permit me to post a couple of silly YouTube videos. The first one I want to share with you is of our old friend Rafa Mendes, who you probably know has a ginormous lip plate. If you’ve ever watched videos of indigenous cultures that wear large lip plates eating and drinking, you know that they sometimes integrate their lip discs into the activity, using them as bowls and such from time to time. Rafa takes a trip down that road and uses his to blow soap bubbles in this clip.
I’ve got to post a thumbnail of that as well because it’s just so charming. The size of your lip disc may not determine the size of your wedding dowry any more, but it does at least determine how much fun you’re going to have entertaining the little kids at the the wedding you’re invited to!
The other video is maybe a bit more controversial, and for the obvious reasons you’d assume when I tell you it’s filed in the “Dildo” category. That’s because it’s my friend from Dildo Tattoo Studio (dildostudio.gr) in Greece having some maniacal fun doing a “piercer challenge” at the shop to test their piercing kung fu… That’s right… BLINDFOLDED PIERCING. They tell me that the next challenge is a blindfolded eyebrow piercing. I hope they’re kidding — the only time I want to see a needle in the eyeball is when it’s injecting ink.
Ok, I mostly hope they’re kidding.
And before you get all stick-up-your-ass cranky about this, these are all friends just goofing around together. It’s harmless fun. Or I should say “low harm fun”. Either way, it makes me happy to see people having fun.
Successful Bipedicle Flap Procedure
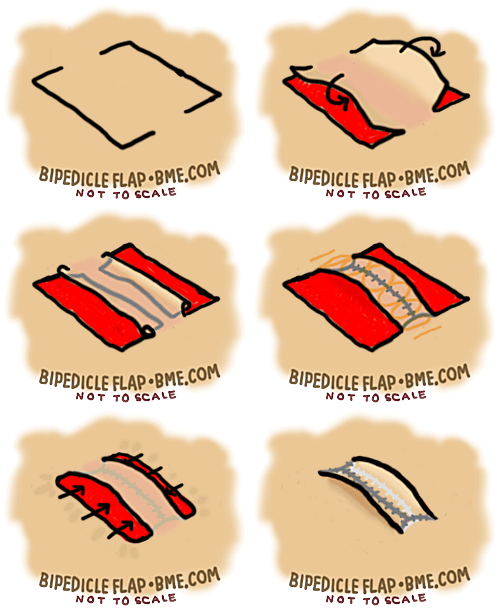 One of the Holy Grails of body modification is a difficult procedure called the bipedicle flap, first popularized by Erl Van Aken — a fascinatingly eccentric bodmod pioneer, who in addition to “inventing” the bridge piercing (if you’ve ever heard someone call it an “Erl”, he’s why), helped build the Lunar Rover for NASA that was used in the Apollo moon missions — who wore a large one on his belly. It’s essentially a hefty “handle” made out of flesh (“bi-pedicle” as in “two feet”), and requires the skills of a reconstructive surgeon to do it. Flap procedures are regularly used by reconstructive surgeons for a wide variety of procedure in a wide variety of styles for different purposes — if you do some googling you’ll find some fun things, like a guy who had to have his cock temporarily attached to the bottom of his scrotum after a cock ring betrayed him — but bipedicle flaps are the only one used in body modification procedures in our subculture. I don’t know if we’re moving too far into medical territory if we move beyond that, but in terms of treating the human body like lego and rearranging its parts, this class of surgery opens a lot of very interesting doors!
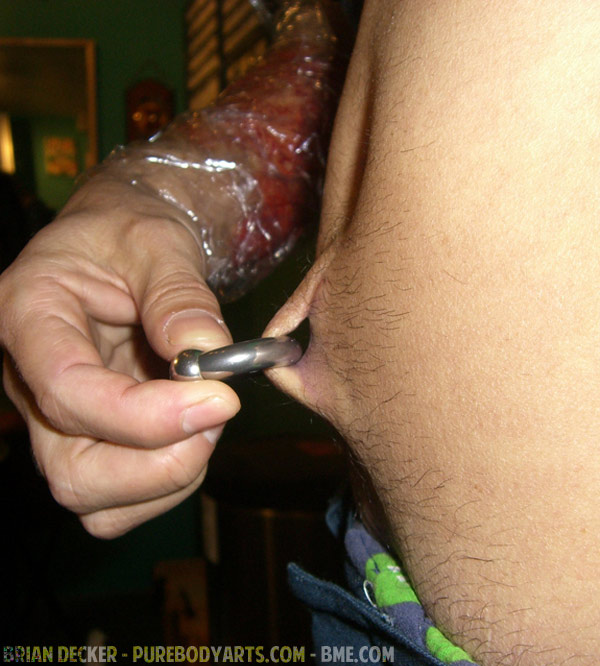
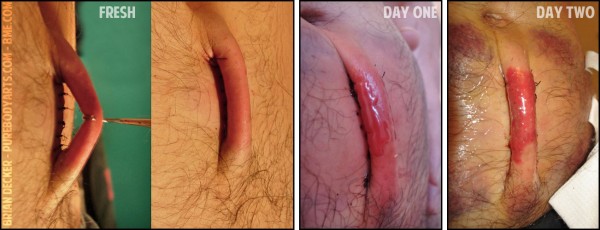
Procedurally I’ve tried to explain how it’s done — very roughly — in the little animation at the top of the entry. I hope you can appreciate how incredibly tricky this is to do! There are very few practitioners capable of doing this procedure, and even among them, the success rate is not perfect. This is one of the best I’ve seen to date, and it should come as little surprise that it was pulled off by Brian Decker (purebodyarts.com) — the only other people I can think of as I write this to have tackled the procedure properly are Jon Cobb and Howie/LunaCobra (although I’m sure there are others). This one though I can show you solid healed pictures of, and in addition, Brian has been kind enough to include comprehensive pictures throughout the healing process — it sure looked touch-and-go for a while, didn’t it? Click on any of the pictures to zoom in.
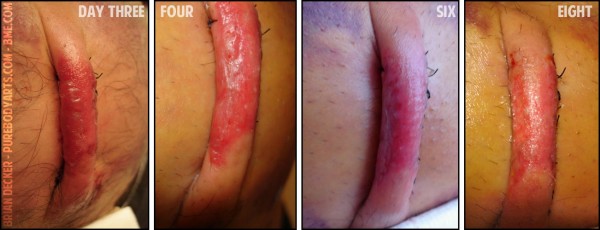
Fresh the procedure looks happy and clean. If all you saw was the fresh picture and the healed picture, you would have a very different idea of the healing process than actually happened. On day one the whole area is inflamed with a fresh bruise and what looks like a blister of lymph and intracellular fluids collecting on the flap. By day two the redness is more specific along the tube of the flap — which must have made them think the procedure was about to fail — and you can see an interesting “halo” of bruises around the procedure. The reason that the bruises are in a halo pattern is because on the central section there is more pressure from how the skin has been pulled tight to fill the open hole (see the animation), and this pressure is enough to “squeeze” any stagnant blood out of the tissue stopping it from bruising there.
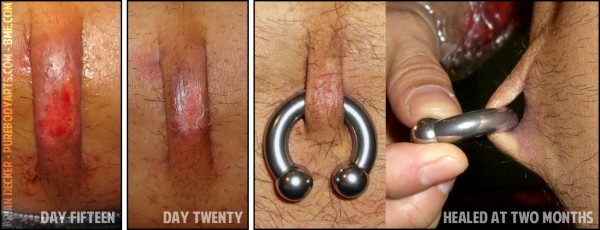
Day three and four are also quite worrying, and although the blistered tissue has receded significantly, and the flap is still very red. However, the sutures and footing looks healthy which is a good sign. By week’s end, the blister is fully dry and the redness has reduced dramatically. Everything is holding together nicely with no separation, but the tube is still fairly swollen.
By the end of the second week, the tube is significantly less swollen and while still centrally red and irritated, is looking better every day. By the end of the second week, the tube is no longer swollen at all, and only minor skin irritation remains. At two months, the procedure is completely healed and is able to support heavy weight.
I’d say this is a good result on a remarkable and challenging procedure that offers anatomical alteration options beyond what can be done with piercing. Congratulations to both Brian Decker and the client for pulling this off.
