This article is a based on the seminar notes from Samppa Von Cyborg on his transdermal implants, as prepared by Alix Fox. In this abridged form it was edited by Shannon Larratt for public presentation. While parts of this article do discuss procedural techniques, it should be emphasized that this is in no way a “how to” or training of any sort. It is being shared here to help those with an interest and passion for body modification understand the development history of transdermal implants as well as some of the medical and “wearer” issues involved.
* * *
THE TRANSDERMAL IMPLANTS OF SAMPPA VON CYBORG
Influential body modification artist Steve Haworth is credited with inventing the transdermal implant, with the first instance being installed in 1996 as Joe Aylward’s famous “Metal Mohawk”. Four years later, Samppa Von Cyborg began implanting transdermals using posts of his own design. While these procedures were largely successful, the designs left much room for improvement. It is Samppa’s philosophy that even if something works reasonably well, it is crucial to keep researching, reassessing, and redeveloping designs and procedures in order to push body modification innovation forward and always strive strive for better results.

Aneta and Samppa Von Cyborg
The very first implants that Samppa used were a simple rectangular base onto which a straight post was welded. The primary fault in this style was that no matter how carefully it was made and finished, there remained a welded seam which would not just rub against and irritate the skin, but act as a potential breeding ground for bacteria. To mitigate this, these days almost all transdermals are manufactured (usually by computer controlled tools) out of a single piece of metal.
The other problem with the first style was due not to the manufacturing process, but the actual design. Although the bases were drilled with two holes intended to allow tissue to grow through and anchor the jewelry, the holes were placed several millimetres from the post, leaving a large area of solid metal around the post itself. Since tissue can not adhere to smooth, solid metal, a gap was left through which bacteria could potentially enter the body, leaving the skin irritated — red, sore, and unattractive.
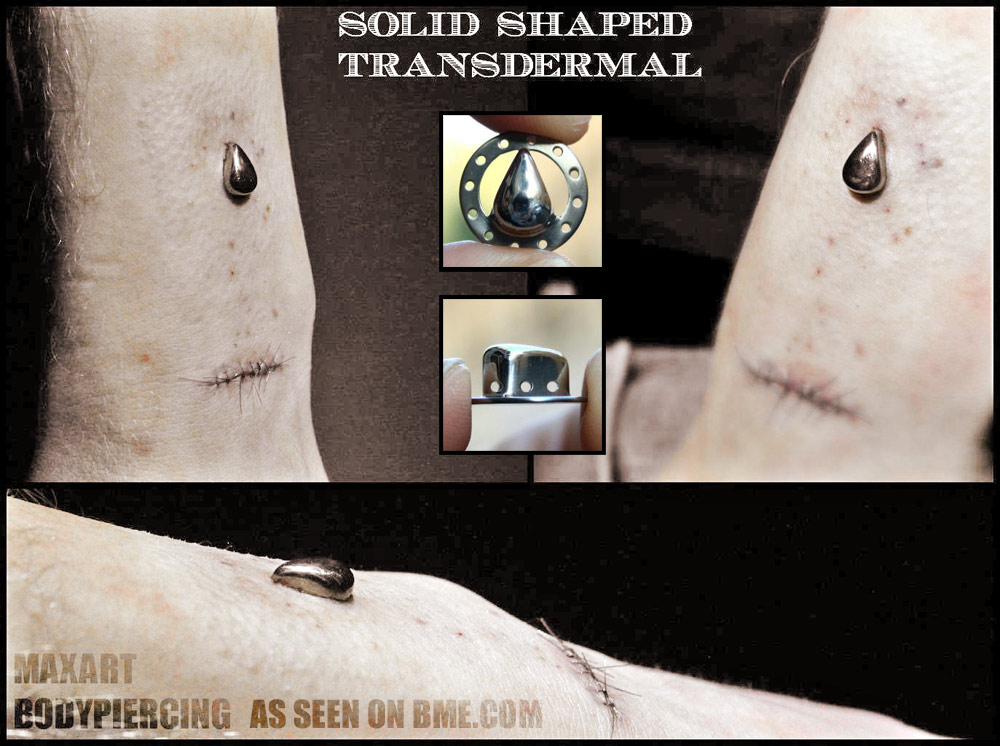
Samppa’s next step was to move to an oval design which attempted to address some of these problems.

Samppa’s oval transdermal implant design.
The first change was to add more holes in the base, four this time, to anchor this generation of implant more securely. Even though the holes were not identical, they were evenly balanced, resulting in more even growth of scar tissue. The placement of the holes closer to the post bonded the portion of the jewelry actually passing through the skin as snugly as possible, and meant that the pocket of tissue around the base of the post was much smaller and less susceptible to discharge building up inside it.
Over one hundred people had transdermals of this design implanted by Samppa, with great success rates, and these are also what Samppa currently wears in his own Metal Mohawk. Many companies manufacture their own variations and thousands of people have successfully healed transdermal implants of this design generation. Nonetheless Samppa felt there was still room for further improvement, and continued researching and seeking ways to improve healing and longevity and reduce inflammation and complications.

Various implant designs currently for sale by different vendors.
SAMPPA’S THIRD GENERATION TRANSDERMAL IMPLANTS
Many aspects of Samppa’s most recent transdermal implants are based on medical studies, and he emphasizes that the body modification movement needs to pay closer attention to medical research, development, and practises than it currently does. Unlike body modification artists who are rarely wealthy, a gargantuan amount of funding is allotted to medical research, and the testing undertaken is far more precise, thorough, and in-depth than the limited anecdotal results achievable by body modification artists. By paying attention to medical journals and other resources intended for surgeons, mod artists can take advantage of relevant knowledge and advances made by people who work on comparable procedures — albeit for very different reasons — but have much greater access to money and resources (and, perhaps distastefully, are able to occasionally dissect those who they have performed procedures on to examine the body’s response in otherwise impossible levels of detail).
The greatest influence on Samppa’s new transdermal implant design was a series of articles discussing amputees that had been fitted with an ITAP, or “Intraosseous Transcutaneous Amputation Prosthesis” (“intraosseous” meaning that it attached to the bone, and “transcutaneous” meaning it passed through the skin — the latter being the part that was relevant to Samppa’s work on transdermals). In short, an ITAP is a metal post that screws into the patient’s bone, then passes through the surface of the skin to the outside of the body, where a prosthetic can be firmly attached to it. ITAPs can range from small, attaching a prosthetic nose for example, or large, attaching a fake leg and capable of handling the full impact weight of the entire body. Ignoring the part of the ITAP that is screwed to the bone, and you have a device that is very similar to the transdermal implant of the body modification world, with many of the same qualities and issues. By studying advances in ITAP design, Samppa was able to extract crucial information in developing the most sophisticated transdermal implant to date.


Various ITAP implants created by the medical community.
From left to right: ITAPs used to hold a facial prosthesis in place, an ITAP in a finger, an ITAP in a femur used to mount a prosthetic leg, and a close-up of the ITAP used in an animal experiment.
Samppa’s reading revealed that the medical teams had been inspired by nature — specifically, by looking closely at the horns and antlers of animals. Like ITAPs (and transdermals), horns begin inside the body, pass through the skin, and protrude outside the body. However, animals do not suffer infections or irritation around their horns as can happen with humans with transcutaneous devices or jewelry. The researchers found that the two key factors were porosity — horns are full of many tiny holes into which a network of fine tissue fibres could grow into and root securely — and roughness — below the surface of the skin, the rough surface texture of the horn made it easier for tissue to adhere.
Samppa sought to apply these design features to his new transdermals, pictured below:

Every single element of the design was carefully considered, the result being a revolutionary new transdermal design which represents a significant step forward for the body modification industry. Some of the elements are as follow:
1. BASE FINISH
Much of the initial theories about transdermals were based on experience with body piercing. In body piercing, you want the jewelry to have a surface as smooth and highly polished as possible in order to move about and slide through the pierced hole without tugging — no adhesion of either the body or bacteria to its surface, which also makes it easier to clean. Without really thinking about it, at first most assumed that transdermals should have the same mirror finish, but the reality is that the last thing you want is for the base to move and slide around — you want to encourage adhesion rather than discourage it! Samppa therefore theorized that it made more sense to make the base rough, allowing tissues to get a better grip on it and anchor it in place more firmly. This is exactly like the subcutaneous part of an animal’s horn, and applies the same principle as used in the ITAP. Additionally, if you have ever seen a complete human tooth, you have probably noticed that the upper (exposed) part of it is smooth, which helps it stay clean, but the root is rough, in order to allow the gum tissues and skull to get a good grip on it and keep it held tight in your jaw.
The manufacturers of ITAPs experimented with making their implants rough by applying a textured layer of bioactive hydroxyapatite, a calcium mineral that makes up a significant percentage of bone and tooth. However, for the body modification world, this is difficult to achieve and prohibitively expensive, to say nothing of carrying with it some long-term risk of flaking off of the metal. Instead, Samppa chose to give the implant a rough textured finish using a technique similar to sandblasting.
2. BASE PERFORATION (HOLES)
The most visibly obvious change in Samppa’s new design is that instead of a small number of large holes, he uses a large number of small holes. The ITAP development team emulated horn by peppering their subcutaneous anchoring plates with multiple 0.7mm diameter holes. Due to a tooling constraint, Samppa uses a similar configuration but with 0.8mm holes — behind the scenes, this had to do with the difficulty in finding a manufacturer that had the complex machinery required to make these items, but was also willing to make them in small quantities at a reasonable price. Samppa is currently working with Barry Blanchard of Anatometal, one of the oldest and most experienced body jewelry manufacturers in the wold, to create the new transdermals.
These tiny holes allow tissue to grow through the plate and hold it firmly in place. Their even spacing encourages even tissue growth, resulting in implants which are held straight and true, unlikely to bend or wobble or shift if they are knocked or pushed — unlike transdermal implants of earlier generations. As with the second generation design, placing the holes as close as possible to the post creates a neat, closed “seal” around the post, preventing bacterial entry and subsequent infection. The smaller holes also result in the development of finer strands of anchoring scar tissue, which tend to lay flat rather than forming lumps or bumps which are visible as they bulge under the skin, as can be the case when bigger clumps of tissue grow through the larger holes in older implant designs. With these older transdermals it was not uncommon for the base to be visible as an obvious raised area of skin.
3. BASE THICKNESS
The base plate is only 0.6mm (22 gauge) thick, which is thick enough to be strong even when perforated with many holes, but is also thin enough to not create any visible raising of the skin.
4. POST FINISH
Unlike the base of the implant, the post, which travels through the skin and outside the body, is designed to be as smooth as possible, with a mirror finish. First of all, this allows it to be cleaned easily and thoroughly. Bacteria find it difficult to adhere to such a surface, making it more hygienic, as well as more visually appealing.
Secondly, the skin around the transdermal post constantly moves up and down due to the natural swelling and contraction of the skin. Swelling does not occur just after the implant procedure — the area should be expected to swell when the wearer gets hot, after exercise, if they drink alcohol or some drugs, if they are ill, or if the implant is struck and injured. Similarly, it will contract in the cold. Giving the post a smooth mirror finish allows the skin to slide up and down the post without aggravation, chafing, or adherence.
5. POST PROFILE
In addition to a mirror finish being essential to the movement of the surrounding tissue, so is ensuring that the post is straight, and of a consistent diameter along its length. Some artists have designed implants with flared posts, which have a smaller diameter close to the base and gets wider as they exit. Obviously this makes motion more difficult, and can even lead to tissue becoming trapped or squeezed, resulting in discomfort or even circulatory complications. Severe swelling could even put upward strain on the base of the implant, pulling it away from the body. Flared posts can also prove more difficult to clean, trapping dirt, debris, and bacteria. Posts of this flared design also require a larger hole to be made to implant them, meaning that part of their length will initially be surrounded by an open wound, which is highly undesirable. For these reasons, Samppa’s transdermals have a post of uniform diameter.
6. POST LENGTH
It is crucial that transdermal posts are long enough to comfortably allow for the natural swelling and contraction of the skin. If a post is too short, flesh could swell right over the top of it, or rub uncomfortably against the rim. Samppa’s design includes posts that are available in 4mm, 5mm, and 6mm in length, even though almost all of the other transdermals currently on the market have posts that are 5mm or less. Posts need to be appropriately sized for the thickness of the skin. Using posts that are too short are unlikely to allow for successful, comfortable healing, let alone an aesthetically pleasing result, and can force a shallower placement than is appropriate. Metal Mohawks usually require 6mm posts, with other parts of the body typically being more suited to 4mm or 5mm.
7. POST DIAMETER
At times, again extrapolating from body piercing knowledge, attempts have been made to produce “large gauge” transdermals — that is, transdermal implants with a thick diameter post. It is Samppa’s reasoning that this is a bad idea, because not only are they likely to be heavy and thus harder for the flesh to support, but they will create a larger channel for bacteria to enter the body — to say nothing of leaving a messy wound should they have to be removed. He strongly urges that if you want the “large gauge look” that you simply attach larger ends to the standard jewelry, which he manufactures with 4mm posts (6 gauge).
The reason Samppa settled on 4mm is that it is an ideal size that is both as small as possible, yet robust enough to stay in place and comfortably bear the weight of any attached jewelry. The reason smaller is better is that the smaller the post is, the smaller the potential channel for access to the inside of the body by bacteria is. History has shown that the average transdermal lasts between two and five years — after that they are removed either due to damage, scar tissue, migration, or simply the wearer tiring of them. Samppa’s Metal Mohawk is now eight years old, but it, along with some of his other older implants will be removed within days of this article’s publication, after which they will be replaced with his newer designs.
8. SINGLE-PIECE TITANIUM CONSTRUCTION
While almost all transdermals currently on the market are being made out of a single piece (to avoid seams which irritate tissue and harbour bacteria) using CNC equipment, some manufacturers are still using stainless steel. Stainless steel contains a tiny amount of nickel, which can leave a blue-coloured deposit in the skin over time, and is not as biocompatible as implant-grade titanium.

The evolution of Samppa’s transdermals, the third generation a fundamental paradigm shift.


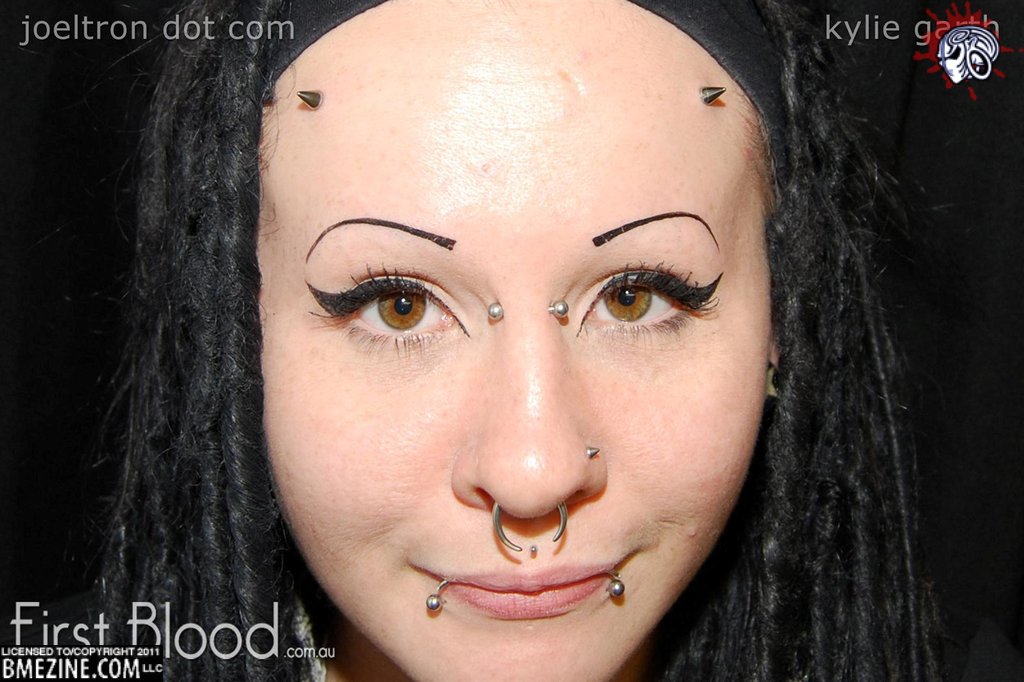
A few of Samppa’s transdermal implant clients.
THE PLACEMENT OF TRANSDERMAL IMPLANTS
Not all problems that people have experienced with transdermals are due to design flaws — proper placement is also essential in ensuring good healing. The prevailing thinking among body modification artists has been that transdermal implants should be placed within the skin layers, as a piercing would be, but Samppa maintains (and he has used this placement from the very beginning) that the correct placement is for the base to rest completely underneath the skin. In the case of the scalp this means resting lightly against the bone of the skull — although it should be noted that the metal does not damage the bone because it there is still a layer of scar tissue between the bone and the metal, padding it — and in other areas it might mean resting lightly against the muscle. This allows for the implant to anchor properly.
One of the reasons that many artists place transdermals too shallow is due to a case in which a man with transdermal implants in his scalp suffered a life-threatening infection, resulting in erosion and loss of a significant portion of the bone in the area. At the time some maintained that this was due to the implant being placed too deep, but Samppa believes that in this case the infection was exasperated by improper implant design making it easier for bacteria to gain access to the body, coupled with inattention to the condition of the implant’s health.
Samppa has been using and monitoring his ITAP-inspired transdermal implants since July 2011, a number of them being done on clients with prior experience with his earlier implant designs. All have reported that the new implants heal faster, with less irritation and a lower incidence of infection. They are also much more securely anchored to the body, which is both a good thing and a bad thing. On one hand it means that they sit straight and true, are unlikely to reject, and can carry much more weight, but on the other hand, if they are struck, they will transfer much more force inward, unlike a transdermal or microdermal which sits only in the skin and thus is incapable of transferring significant force inward.
THINGS TO KNOW BEFORE GETTING TRANSDERMAL IMPLANTS
- Getting transdermals will affect your lifestyle. For example, if you get implants in your head, you’re not going to be hitting any more soccer balls with your head, and if you ride a bike or motorcycle, you will need to adapt the helmet (you may need to use additional foam to build a recess to fit the implants into). There are many subtle and not-so-subtle ways that the implant will affect your life — due consideration and forethought is essential.
- No matter how well placed and designed the implants are, it is not natural for your body to have a metal-filled channel providing access to microbes. Even after they are well healed, it is possible that you will find yourself getting yearly infections in the implants. These infections should not be ignored and will need to be treated.
- It is likely that at some point in the future — most likely between five and fifteen years — you will need or choose to get the implants removed. Think about the fact that you are contemplating at least two surgical procedures.
- It is important to be in the best possible health before your modification appointment in order to increase the likelihood of fast, trouble-free healing.
- If your implants are visible, be prepared to have people approach you all the time. The majority will ask you the same questions over and over, and some of them will be negative. If you can’t cope with this type of public attention, transdermals may not be right for you.
THE TRANSDERMAL IMPLANT HEALING PROCESS
(Using a Metal Mohawk to illustrate — other locations have their own similar but unique issues).
- Immediately after your Metal Mohawk is finished, your head will be swollen and sore. You may experience headaches as the flesh tightens during healing (ibuprofen is helpful).
- About a week later you may suffer from black eyes or puffy eyelids that feel heavy. This is due to the body producing excess lymph fluid around the implants, which drains down the face before dispersing throughout the body via the lymphatic system.
- It is important that you change your pillowcase every two days to ensure that your head is not resting on a contaminated surface while you sleep. Until the wounds and stitches heal you may see a small amount of blood on the cloth in the morning.
- Although most transdermals appear healed in two to four weeks, the actual internal healing process takes much longer — approximately one year. The healing can be “a bit of a roller-coaster”, with the implants looking fine one day, and bleeding for no apparent reason the next. It is extremely important that you monitor your body, be self-aware, and seek help immediately if you suspect anything is wrong. Do not forget the story of the individual who let an infection fester until it had eaten a one inch hole in his skull, exposing the brain, even though the skin above it was intact and looked normal.
- You may experience some hypertrophic scarring during the first year, which can make the skin around the transdermal look like raw meat or a blister. Treating it with a paste made of crushed aspirin and sterile water can help reduce this.
- During the first year of his healing, and for nearly five years afterwards, Samppa wore large, wide spikes. These were not only fashion — he believes that they helped the healing by slightly compressing the flesh to help the forming scar tissue stay flat, as well as acting as a covering that protected the point at which the transdermal passed through the skin from debris and dirt. The compression also helps to drain discharge out of the pocket around the implant.
CARING FOR YOUR TRANSDERMALS LONG-TERM
- As mentioned above, minor infections are not uncommon even in the best-healed transdermals that are kept scrupulously clean. Be conscious of the signs your body gives you and do not ignore them. These signs include redness, itching, heat, irritation, and puffiness. When they occur, Samppa recommends “Orange Easypiercing Spray” (a European mild anti-bacterial solution with active ingredients including alcohol, chlorhexidine digluconate, sodium hydroxide, citric acid, and BHT — similar products are available all over the world). He also screws smooth straight extension bars onto the posts in case of any swelling. If the infection has not disappeared within a week, or gets worse, a prescription for oral antibiotics should be obtained.
- If you need to approach your doctor for antibiotics, be aware that they may never have seen transdermals before, may not understand how they work, and consequently may misinterpret the nature of your infection. There is a very good chance that may overreact and advise that the implants be removed. Alternately, they may prescribe a topical cream to treat surface irritation that will do little to deal with any deeper infection or may even make it worse. It is important that you stand your ground and insist on oral antibiotics to treat the infection. That said, if you or your doctor are seriously worried, you should be willing to go to the hospital without delay. In addition, any reputable body modification artist, whether they have worked on you or your implants or not, should be willing to advise you and give you their opinion.
- In some cases the injectable liquid antibiotic Rifamycin can be of use. It should be applied by sliding the needle down the side of the transdermal post and injecting the solution just beneath the skin so it can act directly on the affected area. It should go without saying that this should only be done by those with appropriate experience and training.
- When travelling abroad, it may be difficult to see a doctor if you need to (and you may incur excessive costs in doing so), yet this is precisely when an infection is most likely due both to the stress of travelling and to the fact that you are being exposed to foreign bacteria that your body is not used to defending against. When travelling you should always endeavour to bring both straight extension bars and oral antibiotics with you.
- Wear extension bars when you fly, because the change in air pressure can cause your skin to swell. The extension bars ensure that the flesh is able to move freely and smoothly around the implants.
- Take care to clean your transdermals thoroughly after swimming — especially in freshwater lakes which have the highest level of bacteria, but in pools and ocean as well. Sterile saline solution is best for cleaning, and this is especially true when travelling since tap water will contain local bacteria that your body has not adapted to.
- This may sound silly, but don’t forget that a Metal Mohawk increases your height! Take care not to bang your head. Also, be vigilant around drunks, who have a tendency to grab or touch your unusual body modification — their intentions may be innocent, but an inebriated stranger whacking your implants is bad news!
- The jewelry that threads into the implants does not enter the body, so it is not essential that it be made of implant-grade titanium like the transdermal. As long as it is not too heavy and you’re not allergic to the material, you can wear nearly anything you’d like. However, because it still comes in close contact with your skin, if you plan to wear it for a long period of time, hypoallergenic, high-grade materials are always recommended. Additionally, wearing rubber O-rings around the base of the transdermal is not recommended. Even though they may look good and seem to hide any scar tissue, rubber or plastic next to the skin increases sweating, which can attract grime and bacteria.
- When the implants are finally removed, it is not as simple as reversing the procedure. Any incisions must be made following the skin’s Langer Lines (the direction in which the collagen fibres lay) to minimize scarring, and all scar tissue within the body needs to be excised before the wounds are sutured.

An example of custom transdermal jewelry ends made by Samppa.
For more information, media requests, or to order jewelry or make an appointment to have transdermal implants done, please contact Samppa Von Cyborg c/o [email protected]
THIS DOCUMENT MAY BE REPRINTED IN FULL SO LONG AS IT IS NOT ALTERED AND NO INFORMATION IS CHANGED, ADDED, OR REMOVED.
* * *
Finally, as this article goes to print, Samppa Von Cyborg is setting out on a European Tour, offering not just transdermal implants, but magnetic implants and other implants (silicone skull implants, tiny ear implants, and more), tongue splitting, flesh stapling, ear pointing, repair of piercing scars and ear reconstruction, and all other forms of body modification — as well as educational seminars and blood painting! Again, get in touch via [email protected]
Samppa can also be found on Facebook at http://www.facebook.com/voncyborg
The current dates for the European tour are as follows:
London, UK == 11th – 15th July
Paris, France == 15th – 18th July
Gruyere/Lausanne, Switzerland == 18th – 24th July
Lyon, France == 24th – 25th July
Freiburg, Germany == 26th July – 1st August
Mannheim, Germany == 1st – 4th August
Krakow, Poland == 5th – 15th August
Berlin, Germany == 15th – 22nd August
Hamburg, Germany == 22nd – 23rd August
Copenhagen, Denmark == 24th – 29th August
Amsterdam, Netherlands == 29th August
Haarlem, Netherlands == 30th August – 1st September
Belgium == 1st – 2nd September (not confirmed yet)
Paris, France == 2nd – 8th September
London, UK == 8th – 13th September (not confirmed yet)
After Europe, the 2012 tour continues into Japan, Brazil, Argentina, Chile, and Puerto Rico, and then in 2013 heads into Australia and March.
Much of this tour is being done by car, so if you live between these cities, please get in touch because it’s easy to stop on the way, even if you live in a small town.

Blood Paintings by Samppa Von Cyborg. The painting on the left includes a self-portrait, and portraits of Lukas Zpira and Steve Haworth, two other pioneering body modification artists. The painting on the left is of Hunter S. Thompson.